Why BPR Zones Matter
- Formed by the convergence of bullish and bearish FVGs.
- Act as liquidity pools, attracting price retracements.
- Provide optimal entry zones for reversals and continuations.
You can access the Indicator from this link:
https://tradingfinder.com/products/i.../bpr-fvg-ifvg/
You can access the Indicator on the TradingView website:
https://www.tradingview.com/script/U...-BPR-FVG-IFVG/
Prop Firm DrawDown Protector : Prop Firm Capital Protection Expert MT5 |Forex Money Management: Forex Trade Management Expert MT5 | ICT Concepts Indicator MT5 |Smart Money Concepts Expert MT5 | Smart Money Trap Scanner | Get a free Expert Advisor license via Telegram and WhatsApp
Key Features of the BPR Indicator
1. Visualized Trading Zones
- Bullish BPR Zones → Marked in blue boxes (price tends to bounce upward).
- Bearish BPR Zones → Marked in orange boxes (price tends to reject downward).
2. Multi-Market & Multi-Timeframe Compatibility
Works across:
- Forex (GBP/USD, EUR/USD, etc.)
- Cryptocurrencies (XRP, BTC, etc.)
- Stocks & Indices
- Commodities (Gold, Oil, etc.)
3. Advanced ICT-Based Logic
- Detects Fair Value Gaps (FVGs) & Imbalance FVGs (IFVGs).
- Filters out weak zones, focusing only on high-probability BPR retracements.
How the BPR Indicator Works
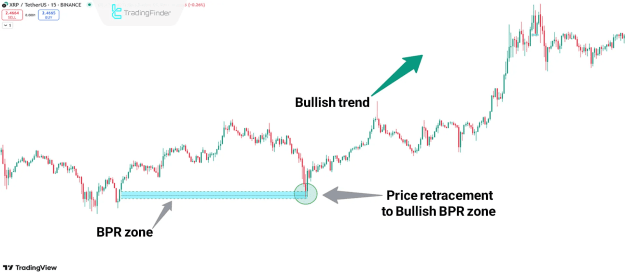
Bullish BPR Example (XRP/USD – 15M Chart)
- The indicator identifies a bullish BPR zone (blue box).
- Price retraces into the zone, confirming support before a strong bullish reversal.
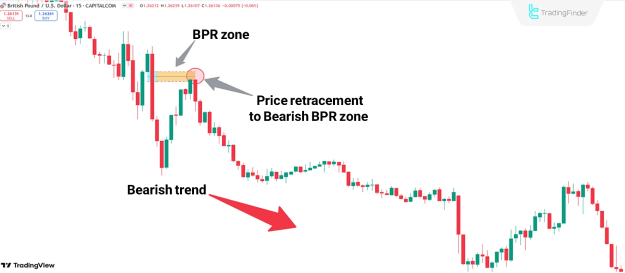
Bearish BPR Example (GBP/USD – 15M Chart)
- A bearish BPR zone (orange box) forms.
- Price retests the zone and experiences a sharp bearish rejection, continuing the downtrend.
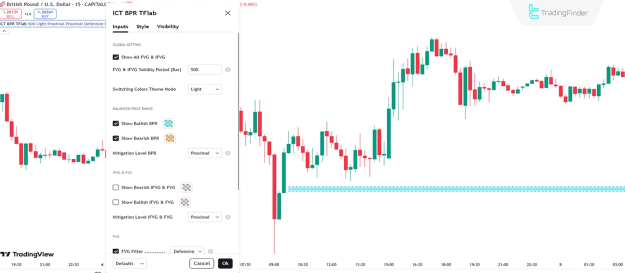
Customizable Indicator Settings
Traders can adjust the BPR Indicator for optimal performance:
Core Settings
- Show All FVG & IFVG → Displays all imbalance zones.
- FVG & IFVG Validity Period → Sets expiration (default: 500 candles).
- Color Theme Mode → Adjusts visual styling.
Zone Visibility & Alerts
- Show Bullish/Bearish BPR → Toggles zone displays.
- Mitigation Level Alerts → Notifies when zones are tested.
- FVG Filter → Customizes gap detection criteria.
Why Traders Should Use the BPR Indicator
- Pinpoints High-Probability Entries → Trade where institutional liquidity resides.
- Reduces False Signals → Focuses only on confirmed FVG overlaps.
- Works in All Market Conditions → Effective in trends and ranges.
Conclusion
The Balanced Price Range (BPR) Indicator is an essential tool for traders using ICT-based strategies. By identifying key retracement zones, it helps:
![]() Capture high-probability reversals
Capture high-probability reversals
![]() Avoid low-quality trade setups
Avoid low-quality trade setups
![]() Align with smart money movements
Align with smart money movements
For best results, combine BPR zones with:
- Volume analysis
- Price action confirmations
- Higher timeframe trend alignment
Pro Tip: Always wait for price confirmation (e.g., candlestick rejection or breakout) before entering trades within BPR zones.