The price of any asset in the market is determined by the equilibrium between supply and demand:
- Supply represents the available quantity of an asset. When supply exceeds demand, prices decline.
- Demand reflects buyers' willingness to purchase an asset at the current price. When demand outweighs supply, prices rise.
TP & SL Tool: Risk Reward Ratio Calculator RRR MT4 | Prop Firm Protector: Trade Assist Prop Firm Plus TF Expert MT4 | Money Management + DrawDown Protector: Trade Panel Prop Firm Drawdawn Limiter Pro MT4 |Get a free Expert Advisor license via Telegram and WhatsApp
Supply & Demand in Smart Money Concepts (SMC)
In Smart Money Concepts (SMC), supply and demand zones are critical areas where institutional traders place large orders, influencing price movements. These zones help traders identify potential reversals and trend continuations.
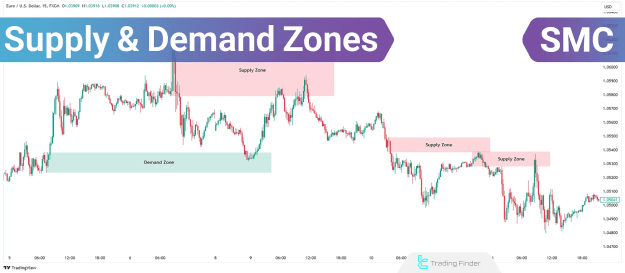
What Are Supply and Demand Zones?
- Supply Zone
A Supply Zone is a price region where an abundance of sell orders increases supply, leading to a price drop.
- Demand Zone
A Demand Zone is a price region where a surge in buy orders increases demand, driving prices upward.
Why Are These Zones Important?
- They indicate areas where institutional traders (Smart Money) enter the market.
- They help traders anticipate reversals or continuations in price trends.
- Prices often react quickly when retesting these zones.
How to Identify Supply and Demand Zones
To locate these zones, traders must first understand market structure:
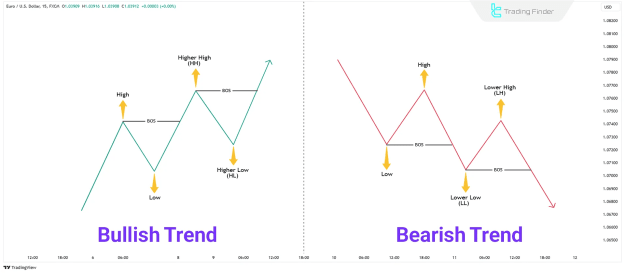
Break of Structure (BOS)
A BOS occurs when the market breaks previous price levels to continue its trend:
- In an uptrend, price breaks the previous Higher High (HH).
- In a downtrend, price breaks the previous Lower Low (LL).
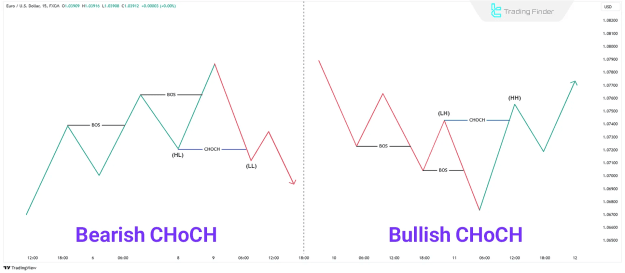
Change of Character (CHoCH)
A CHoCH signals a potential trend reversal:
- Bullish CHoCH: Price shifts from a downtrend to an uptrend by breaking a Higher Low (HL).
- Bearish CHoCH: Price shifts from an uptrend to a downtrend by breaking a Lower Low (LL).
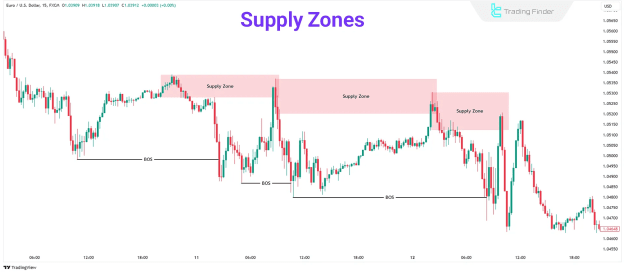
Identifying Supply Zones
- Formed during pullbacks before a BOS or CHoCH.
- Characterized by rapid price declines after the zone is tested.
- Often seen in downtrends.
Identifying Demand Zones
- Formed during pullbacks before a BOS or CHoCH.
- Characterized by sharp price increases after the zone is tested.
- Typically found in uptrends.
How to Trade Using Supply and Demand Zones
Trading in an Uptrend
- Identify a bullish CHoCH or BOS.
- Locate the Demand Zone (where price previously rallied).
- Wait for price to retest the Demand Zone before entering a buy trade.
- Place a stop loss slightly below the Demand Zone.
Trading in a Downtrend
- Identify a bearish CHoCH or BOS.
- Locate the Supply Zone (where price previously dropped).
- Wait for price to retest the Supply Zone before entering a sell trade.
- Place a stop loss slightly above the Supply Zone.
Conclusion
In Smart Money Concepts (SMC), supply and demand zones are fundamental to understanding price movements. These zones reveal where institutional traders accumulate or distribute positions, providing high-probability trading opportunities.
- Supply Zones indicate selling pressure, often leading to downtrends.
- Demand Zones indicate buying pressure, often leading to uptrends.
By mastering these concepts, traders can align their strategies with Smart Money and improve their market timing.